Yeti coolers are great and come in a variety of colors, but sometimes you want to personalize your cooler by painting it.
You might want to add some camo paint to your cooler for your hunting trip or maybe you’re just adding some flair to the cooler for your own personal style or as a gift for a friend.
It’s not too difficult to paint a Yeti cooler but there are some important steps you need to take to make sure that the paint sticks properly and doesn’t scratch and flake off after just a few uses.
There are also a few different techniques you can use to paint your Yeti cooler – each of which will give you a different look. And some ways of painting it are easier than others.
You can paint a Yeti cooler with spray paint or through hydro dipping without need for a primer. But if using regular paint you’ll need to sand the cooler first, apply a primer paint designed for plastic, then paint your cooler. After painting cover your cooler in a waterproofer to prevent the paint from scratching and flaking.
1. How To Spray Paint a Yeti Cooler Video
Probably the quickest, easiest and most cost effective way to paint your Yeti cooler is to use spray paint.
If you’re going for a camo look on your cooler then spray paint is going to be your best option but you can also achieve a variety of other looks using spray paint as well.
What Spray Paint To Buy
When it comes to what spray paint you buy there are a lot of different options out there and most of them will work fine.
The biggest thing you want to make sure is that the spray paint will work on plastic (most of them do but not all of them). Generally you’ll want to opt for an oil based spray paint as these tend to stick better to plastic and last longer.
If you’re going for the camo look then you’ll want to pick a spray that has a matte finish, not a glossy finish. But if you’re doing a different design then whatever paint you prefer is fine.
This Rust-Oleum Camouflage Spray from Amazon is perfect for spray painting Yeti coolers and comes in a variety of colors used for camo – green, brown, tan and black.
How To Spray Paint Camo Onto Your Yeti Cooler
If you’re going for the camo look on your cooler there are a couple of different methods or ways of approaching it.
What you’ll need:
- Masking tape (to cover the logo and latches)
- 2-3 colors of spray paint
- Small leaves and sticks to act as a stencil
- Tarp or large piece of cardboard as a drop sheet
NOTE: Always make sure to spray paint your cooler in an outdoor setting with good ventilation as the fumes can be dangerous. Also pay attention to the wind direction so you don’t get paint on yourself or other places you don’t want it.
You don’t need to sand your cooler or add a primer if you’re using spray paint on your cooler.
- First give your Yeti cooler a good clean to get rid of any dirt or grime and then dry completely.
- Remove or taping up the rubber latches and side rope handles. You’ll also want to tape up the Yeti logo as well as the rubber feet and inside rubber gasket as well as the top of the inside of the cooler (about 3-5 inches down into the cooler) if you plan on painting the inside of the lid.
- Cover the entire cooler in your chosen base coat color (most people will choose green here)
- Gather your leaves and some cool shaped sticks. Hold your leaves/sticks over the cool and spray lightly with a different colored spray paint. Move these around the cooler and spray them wherever you think they’ll look cool.
- If you make any errors or don’t like how it turns out then just spray over the problematic area with the base coat color and wait for it to dry until you try again.
- Once you’ve done one layer of stick/leaf outlines add a second layer with a different color. Usually one color lighter than your base coat and one color darker looks good.
- You do NOT need to add a waterproofer over the top of your spray paint. However, you can add one if you want.
Video Guide To Spray Painting Your Yeti Cooler
Below you can see some good video guides on how to spray paint your Yeti cooler
- Add a base coat
2. Paint Your Yeti Cooler With Regular Paint
If you want a more intricate design or if spray paint won’t achieve the look you want then you can paint a Yeti cooler with regular paint.
This allows you to create really cool and personalized designs and you can be more precise with paint brushes and even pens to get the exact look you want.
However, painting a Yeti cooler with regular paint does require more work to prep the cooler before paint and to seal the cooler after painting so the paint doesn’t just scrape off.
To paint a Yeti cooler simply first sand the exterior then tape up the logo, rubber latches and gasket and remove rope handles to avoid them getting paint on them. Apply a primer paint designed for plastic followed by the paint color of choice. For extra durability and longevity add a waterproofer over the top.
What You’ll Need To Paint Your Yeti Cooler
In order to paint a Yeti cooler you’ll need quite a few things to do the job correctly.
If you just apply acrylic paint directly to the outside of your Yeti cooler it might look ok for a day or two but as soon as you start using the cooler the paint is likely to come straight off.
To paint a Yeti cooler you’ll need the following things:
- Sandpaper
- Masking tape
- Primer paint
- Colored paint (for the main artwork)
- Brushes, sponges, pens, pencils (whatever you’re using to get the design you want)
- Waterproofer
The Steps to Take to Paint a Yeti Cooler
Once you’ve gathered all your gear here are the steps to take to paint your Yeti cooler.
1. Cover Up The Logo and Anything Else You Don’t Want Painted
Using masking tape cover up the logo if your Yeti cooler as well as any other parts you don’t want to be painted.
This may mean covering the rubber latches, rope side handles and even the non-slip rubber feet with masking tape.
Use masking tape and a sharp knife to cut around difficult shapes.
You can also remove the rubber latches, rope side handles and non-slip feet if you don’t want to cover them in masking tape. They are fairly easy to reattach once your paint job is complete.
2. Sand Down Your Yeti Cooler
Yeti coolers are made from smooth and shiny polyethylene plastic and if you try to paint directly onto the surface of the cooler the paint will peel off rather quickly.
Use sandpaper all over the areas of the cooler you want to paint in order to make the surface rougher so that the paint can stick easier.
It helps to use an electric sander if you have one as it’ll save you a lot of effort. But you can hand sand it if you don’t have an electric sander.
3. Give Your Cooler A Good Wash
Once you’ve sanded your cooler you’ll want to give it a good wash with warm soapy water and a good scrub with a sponge or brush to remove any dirt, debris or tiny pieces of loose plastic from the sanding process.
Once you’ve scrubbed the cooler give it a good rinse with a hose and then wipe it down with a towel.
Make sure your cooler is completely dry before moving onto the next step.
4. Cover The Cooler In a Primer
Next you want add a layer of primer to your cooler. The primer is a base layer that sticks well to the plastic cooler and will also allow your paint to stick well.
It’s really important you don’t skip this step, if you do your paint is much more likely to scratch off your cooler rather quickly.
Ideally you want to use a white primer so that your design shows up nicely over the top.
You ideally want to use 2-3 coats of primer, waiting for each coat to dry before adding the next coat on.
You can use a spray primer like this white plastic primer spray paint from Amazon or you can get paint in a tin like this primer for all surfaces from Amazon.
Both will work fine for your Yeti cooler but I personally prefer the spray primer just because it’s easier to apply and tends to dry quicker. However, it can be more expensive and you get a lot more in a tin, so if you’re on a budget the tin of primer is your best option.
5. Paint The Cooler How You Want It
Now is the most fun part, you can now paint your cooler however you want.
You can use acrylic paint for this part or really any type of paint you want should be fine. You’ll later be sealing and waterproofing the paint so it doesn’t scratch off.
If you’re doing a more simple design with just a couple of colors you can also get cheap tester pots of house paint from your local hardware store.
Use brushes or sponges or whatever you want to apply your paint and design.
If you’re like me and are NOT an artist then you can use carbon paper to print a design and then trace it onto your cooler before you apply the paint. This can be a great way to give your cooler a more professional look.
Remember when painting that it can be a messy job, especially with spray paints. You might benefit from using a tarp or plastic sheet to protect the ground under the cooler and consider any animals, children, or other people in the area.
6. Leave It To Dry
This is the simplest, yet tormenting, step because the anticipation might just kill you.
Let the paint dry, it might take at least 24 hours and if you’re unsure then just wait the 24 hours to be sure.
7. Seal The Paint
Applying sealer will not only coat the cooler with a glossy finish but will also seal the paint so it’s much harder to chip off. If you want your design to last then adding a few layers of sealant will help a lot.
I’d recommend giving the sealer two or three coats to be extra sure the paint isn’t going anywhere.
Mod Podge is a good sealant that is easy to apply and has been used by millions of people. You can choose between a matte or gloss finish depending on what design you’re going for.
8. Keep it dry with waterproofing
If you plan on using your cooler in outdoor environments, like camping, fishing, hunting, or even just backyard parties, it’s a good idea to waterproof it once the sealer is completely dry.
Again, give it another day to be sure that the sealer is completely dry before applying the waterproofing.
Waterproofing will make the paint last even longer and it won’t get damaged if your cooler is left out in the rain.
The Krylon Crystal Matte Clear Waterproofer is a good affordable option and comes in both matte and gloss.
How To Paint a Cooler Video Guide:
While the girl in the video below is painting a cheap cooler, not a yeti cooler the same process is used.
3. Hydro Dipping A Yeti Cooler
Another great method for painting your cooler is a process called hydro dipping.
Hydro dipping allows you to get some really cool designs on your cooler that you couldn’t reasonably paint yourself. You can purchase some really wicked prints like this We The People Distressed Flags from Amazon.
Just search for “hydrographic film” and make sure that it’s water transfer film and that it comes with an activator (or purchase one separately).
You can also use spray paint on the surface of water to create some cool, unique hydro dipped designs on your Yeti cooler.
I’ve done a full break down of exactly how hydro dipping works if you want to understand the science behind it as well as some of the biggest hydro dipping mistakes you NEED to avoid.
If you plan on hydro dipping your Yeti cooler you want to make sure you do it right.
1. Clean And Dry Your Yeti Cooler
Before hydro dipping your Yeti cooler you need to make sure that your cooler is clean and dry.
Any dirt or grime that is on the cooler can stop the paint from sticking to or will get caught under the paint and leave bumps and blemishes that you don’t want on your final product.
Also why hydro dipping the paint you use it hydro phobic, meaning it repels water (kind of like how oil repels water).
If your Yeti has even the smallest drop of water the paint will not stick properly in that section and can tear off leaving a hole in your beautiful artwork.
2. Remove The Lid, Rubber Latches, Side Handles and Rubber Feet
Before hydro dipping your Yeti cooler you also want to remove the lid, rubber latches, side handles and rubber feet from your cooler.
The lid has a single pin so isn’t too difficult to remove and the rubber latches and side handles also come out fairly easily. Even the feet are fairly simple to remove and all up it should only take 20 minutes or so to remove everything.
You can cover these things with masking tape but the paint can go everywhere and things can also get wet so if you don’t remove them there is a chance they’ll end up partially painted.
3. Apply Masking Tape To Areas You Don’t Want To Get Any Paint
If you don’t want to paint over the Yeti logo on the front of your cooler or some of the other logos around the cooler then cover them with masking tape and use a sharp knife to cut the tape precisely around the logo.
4. Apply A White Primer Base Coat
One of the biggest mistakes people make when hydro dipping is they fail to apply a coat of primer to their cooler (or other products they are dipping) before they do it.
You can use a spray paint primer or a primer from a tin that you paint over your cooler. Both will work fine. The spray paint is easier to apply but more expensive and the primer in the tin will go further and is the more affordable option, especially if you are painting multiple different things.
5. Do One Side At A Time, Placing Plastic Inside + All Over The Other Sides
When hydro dipping your Yeti cooler you want to apply the paint to one side at a time.
First cover ALL the sides of the Yeti cooler that you don’t want to get paint on with some sort of plastic and tape it down.
This includes the inside of your cooler as you don’t want paint to get inside your cooler.
In the video below you can see how the cooler is covered with plastic on all sides except the side being painted so that no weird paint gets on the wrong part of the cooler. This is time consuming but worthwhile for a good end result.
6. Use a Large Tub To Prepare The Hydro Dip Paint
You’ll need to get a tub when the opening of the tub is larger than the largest side of your Yeti cooler.
This means the opening of the tub needs to be larger than the lid of your Yeti cooler or the widest side (usually the front facing side).
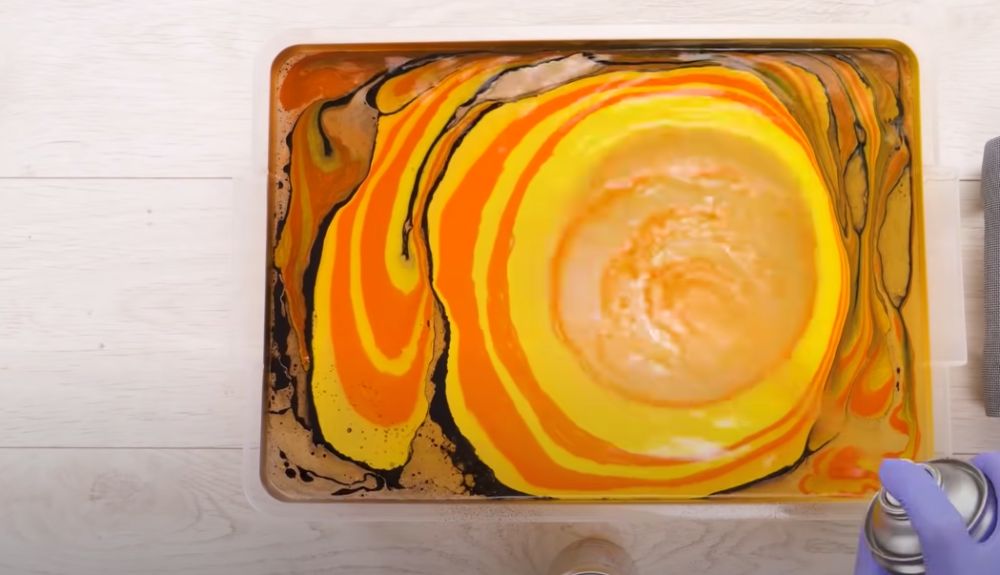
Prepare your hydro dipping paint on the surface of the water
- If you’re using spray paint then spray a layer of paint that fills the top of your container. Make sure not to spray too close to the water so you don’t create bubbles.
- If you’re using hydro graphics made sure the water soluble side is placed DOWN in the water and don’t forget to spray on activator which is needed for a good result. You can learn more about this in my article on how hydro dipping works.
7. Lower Your Yeti Cooler On An Angle
Now it’s time to hydro dip your Yeti cooler.
You want to make sure you lower the Yeti cooler on an angle. Don’t put it directly into the water flat as air bubbles can occur and this will ruin the final look of your cooler.
Now lower the cooler into the pain at a slow pace. Not a snails pace but not too fast either.
8. Break Surface Tension and Push Excess Pain Away
Once you’ve fully dipped the side of your Yeti cooler you’re painting use your hand (with gloves on) or a stick to break the water tension and push the excess paint away from the cooler so you can pull it out safely without more paint getting on it.
One of the biggest mistakes people make when hydro dipping is they fail to do this and extra paint ends up on the cooler on the way back up.
9. Dry With Air Blower or Blow On It
Once out of the water you want to dry the paint relatively quickly if you can with an air blower.
If you don’t have an air gun you can use a hair dryer, just be careful not to get too close with the heat of the hair dryer. You can also blow on it with your mouth but this is not the best solution.
10. Remove Tape As Paint Begins To Set
It can take a while for the paint to fully set but it’s generally best to remove your tape before the paint fully sets because otherwise you can get flaking at the edges of your paint.
Once pulled off leave the paint to dry for 1-3 hours before doing the next side of your cooler.
11. Repeat The Process For Every Side Of The Cooler (and Lid)
Now simply repeat the process for every side of the cooler as well as the lid of your cooler to end up with a fully painted and unique Yeti cooler design.
11. Apply A Sealer Over The Top (Optional)
Once fully painted you will want to apply a sealer over the top of the paint in order to stop the paint from scratching off and to help it endure the elements.
The Krylon Crystal Matte Clear Waterproofer is a good affordable option and comes in both matte and gloss.
Watch A Yeti Cooler Get Painted With a Hydro Dip Graphic
Below you can see a video of someone hydro dipping a Yeti cooler and adding graphics to give it an amazing metallic feel.
4. Yeti Cooler Skins
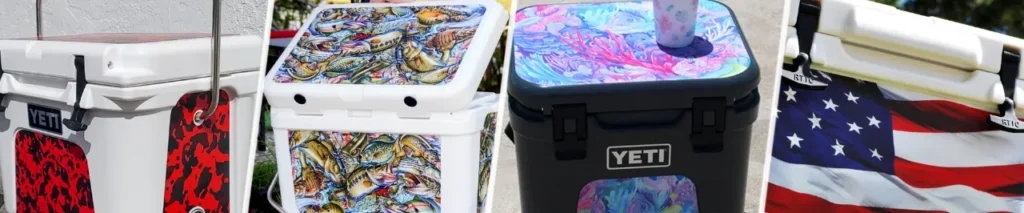
Another way to cover your Yeti cooler is to get some Yeti cooler skins.
This isn’t technically painting your cooler but rather these are stickers specifically shaped and designed for Yeti coolers.
This can give a really cool look to your cooler for a fraction of the effort, but it is generally going to be a bit more expensive.
Companies like Mighty Skins and USA Tuff are great options for Yeti cooler skins.